Something that came up in the recent run-through of my class Sketching Fundamentals and that is also a frequently asked question generally is how do you capture the atmosphere of a place quickly (in drawing or painting) before the light changes, and how to you find a good place to set up and work?
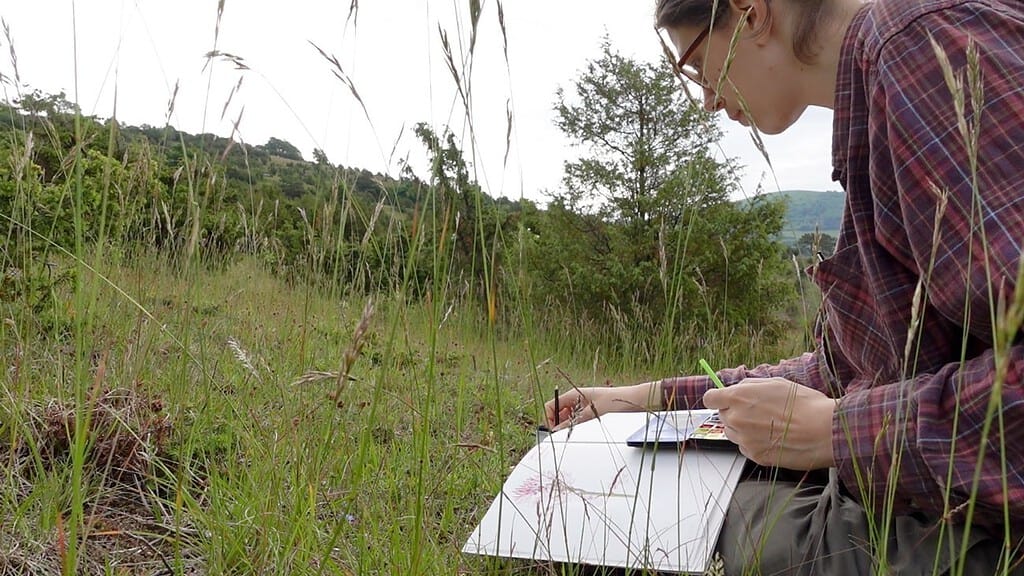
I will answer this as it applies to landscape sketching or for smaller intimate scenes (tree portraits, or individual plants or animals with a bit of vegetation around them). For smaller subjects like individual plants it’s usually possible to find a spot that’s in the shade so that your light doesn’t change too much, but for landscapes that is sometimes not the case.
Find your composition
The first step for me is usually finding an interesting spot that leads to a good composition, and then looking around if there is a place nearby that lets me sit or stand comfortably, and without standing in the way for others. I often decide based on the subject or terrain if I want to paint standing or sitting. Make sure you have organized your tools in a way that you can quickly set them up and get started within a minute. If this is interesting for you, I will show how I get ready for sketching in the field and set up my things in a video. Of course getting out a pencil and a sketchbook is a bit faster than setting up a tripod and a palette for a longer session. My approach is using minimal equipment so that I’m most flexible.
Find a good place
I like to set up my gear in places that are not so frequented by people, so that I can concentrate on my sketch. When you’re painting out in nature in a rural area, this is not a big problem. There have been days when I haven’t met a single person – which is weird in itself. And if you happen to meet someone, people are usually curious and friendly. When you’re sketching in an urban area, there might be more people around, but they’re usually busy. I’ve had the longest conversations when I’ve set up my painting gear in or around small towns or villages. I’m not very good at painting and chatting at the same time, so I usually take a small break when someone comes up to me.
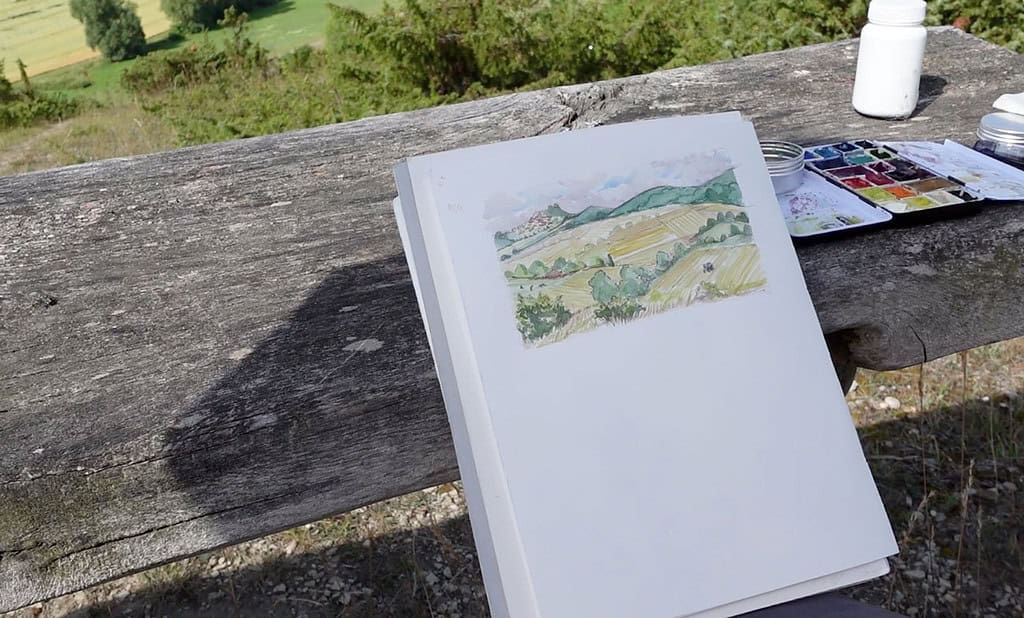
Whether you sit or stand depends on your preference and your subject, and on your tools, sometimes you will get a better view sitting and sometimes standing. I like to make use of benches when possible, often these are in very nice locations with nice vistas, and it’s great to have additional space to put your things. When you’re standing during painting, you will need some kind of easel to hold your paper and water container, since you want your hands to be free to hold brushes and paints.
Find a comfortable spot for painting
I decide whether I sit or stand based on the gear I brought and the kind of view I want to have on the subject, and I often move around a bit in the area before I decide on a spot. Once I sit down comfortably I’m not as motivated to change that. Comfort is another important factor – you’re more likely to do a longer painting session when you’re in a cozy spot.
This means having a nice place to sit or stand, but also things like shade, practical clothes, something to eat and drink, protection from the sun (or from wind and rain), and a practical setup that doesn’t fall apart while you’re sketching. The first thing to go away will be your motivation to paint if you don’t organize yourself well, at least that’s the case for me.
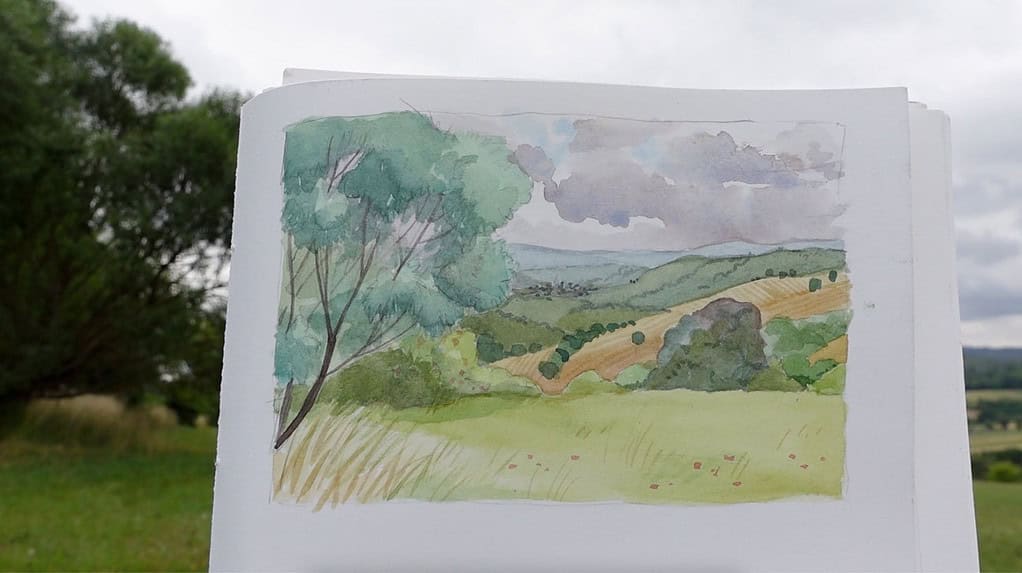
Put down a framework first to capture the essence of a scene
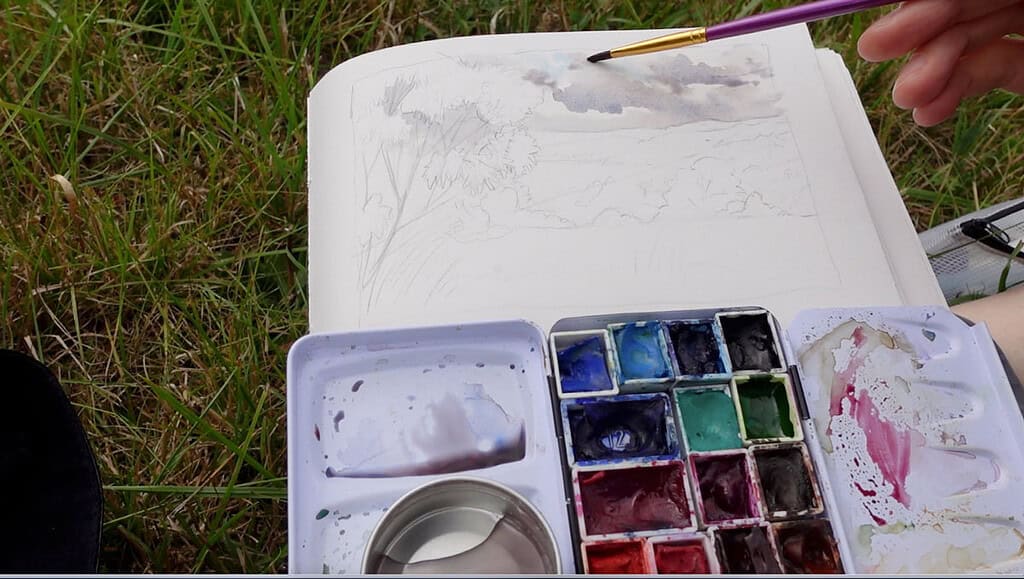
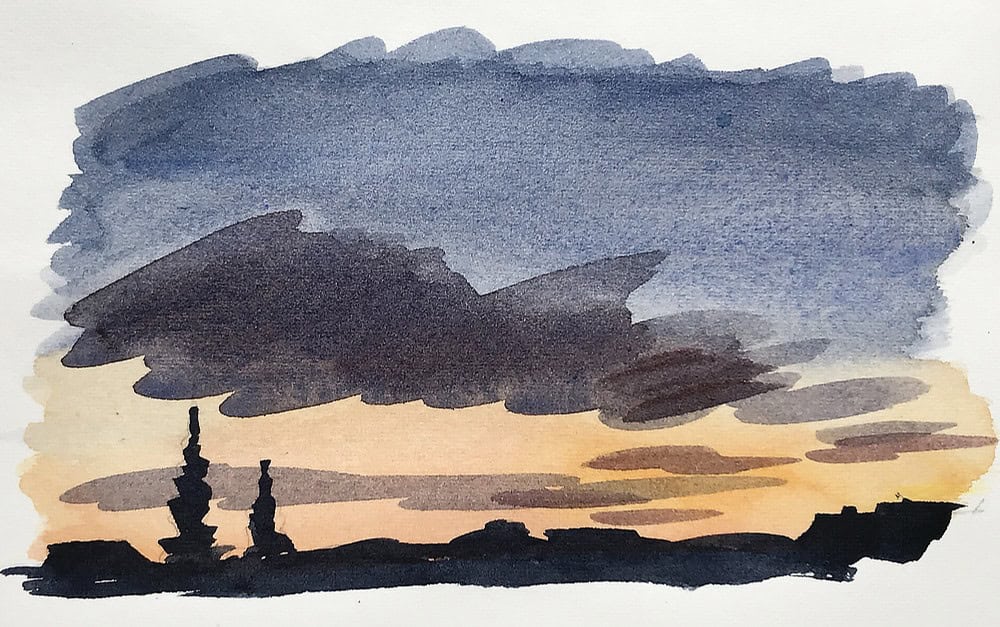
One thing that is important to understand about sketching landscapes is that the light will change very quickly outside. After 20-30 minutes the light situation usually has changed if it’s a sunny day, and you either want to be finished by then, have a good light concept like a small thumbnail, or you need to have a good memory (or a memory aid like a photo) to finish your painting. Even though the light changes, I often find landscape sketches to be very forgiving and adaptable, and even with watercolor you can adapt the lighting and mood a bit during your session.
What I try to get down first are big masses, big shapes based on value. This is something we have to train ourselves to do, because the human brain is wired to notice details. Squinting helps to simplify shapes and do a quick pencil sketch. Don’t lose yourself in details right from the beginning. You will need a structure for your sketch, a framework that you can later refine.
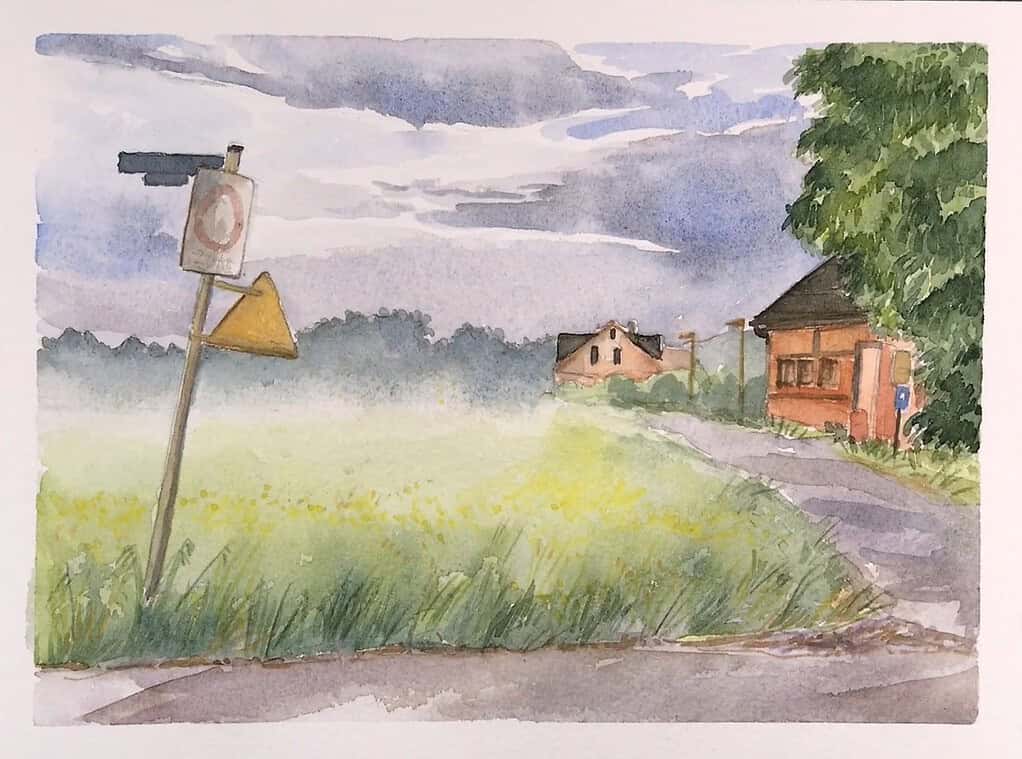
This will also help you to capture the essence of a scene – what it is about. I always try to establish from the very start to show what I’m interested in in a scene, and I focus on that. Is it the sky? Then show the sky. Is it a pond that has interesting water reflections and small grasses overlapping at the edge? Then focus on that, and show it. Fade out the rest of the elements in your landscape, they are only the backdrop. You don’t need to add details in every corner of your painting. If you have detail and information everywhere, then your sketch or painting will be about nothing. You need to lead the eye to a focal point, and you do this by adding more information to some areas, and less information to others. So think about the places where you want to add contrast, highlight, texture and details – it can’t be everywhere.

Basic rules for landscapes
One very important ingredient for good sketching and painting is close and thorough observation. Even for small, quick sketches it pays off to really observe what shapes and angles look like. So take your time and understand what you’re looking at before you make one decisive stroke with your brush – this saves time too.
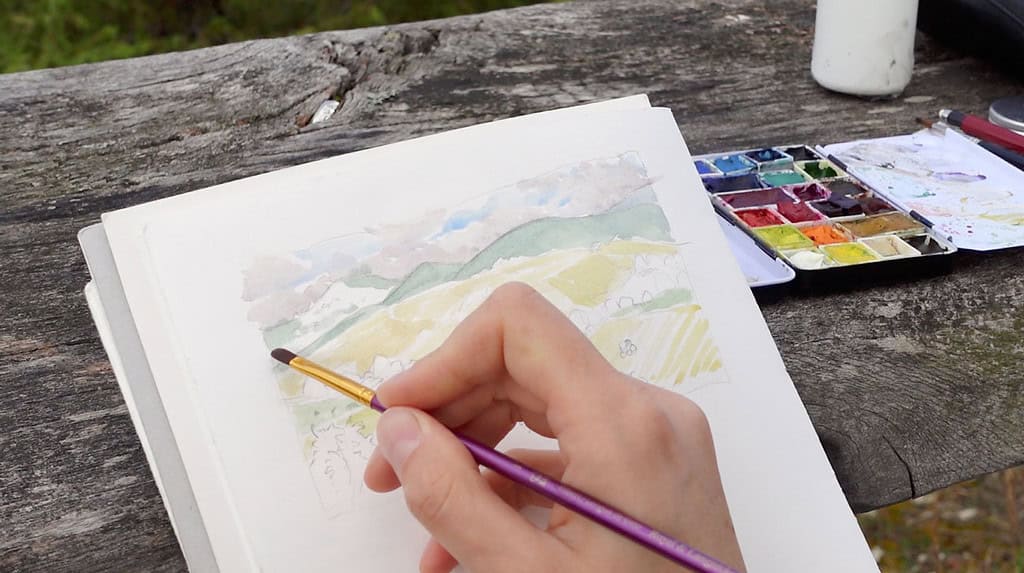
Usually in the back of a landscape sketch we have lower contrast and low details – this is the principle of aerial perspective. Things are usually paler and bluer and less pronounced in the distance. So establishing a pale background with a few strokes is one great technique to create a stage, a 3d space for the things that happen in the foreground.
When you’ve painted for a while and have added a number of elements, take a look and see where you can soften edges, or where you can add accents. Details should always come last.
Focus on values instead of colors
Working quickly in the field also means being comfortable with your tools, and being able to mix quickly. This will come with practice, and overall for painting I find it’s much more important to get the values right, than any exact color. Usually you will want to show a certain mood. Similar to the big shapes, it’s helpful to find unifying colors in your scene, so that the painting doesn’t fall apart. This can be done with very few colors and mixes, so you don’t have to mix each green exactly. Landscape sketches are very forgiving, and they often work better when you leave out details instead of putting more details in. This will help you to move quickly, and capture a scene in less than 30 minutes.
When I’m in the middle of a painting and I see that the light has already changed and my time is running out, I often take a photo, so that I can finish the sketch at home, and have a reference for the details. You could call this a painting insurance. Another technique you can try is to do a quick color thumbnail sketch at the beginning, or try to memorize the most important aspects of a place – often it doesn’t really matter what something really looked like, but more how it fits into your painting. You will notice that you will change small things in your sketch anyway – this is your creative license when making art.
Consider the weather
You can paint very early or late in the day, this will give you interesting light and it will be less hot in the summer. Often the early mornings are the only time I can get a quick landscape sketching session finished, since it will be scorching hot later in the day. On sunny days or in the middle of the day, I always try to find painting spots in the shade, and when that’s not possible or the light is a bit unstable, I bring a small white umbrella that I can sit under. This umbrella is for covering the paper, I cover myself with long clothes and a hat. This can also keep bugs away. This is not optimal when it’s windy, but overall it works. I don’t advise sketching outside on excessively hot days in the middle of summer, or during heat waves – take care of yourself and make art in a shady, cool place if possible, and drink enough water (not your painting water though).
Rain can be a problem when the air is so humid that your sketch won’t dry, but if you have an umbrella or paint from under a roof, you can shield your painting from moisture, and plan in some time to let everything dry. In autumn, I often only bring (colored) pencils and dry media, and add watercolor at home. I haven’t painted in the snow in a long time, but I know a fellow artist who uses alcohol as his painting water, since it doesn’t freeze. My scenario for sketching outside in winter would definitely include a hot water bottle and mittens, but I have to admit I more often sketch through the window or from photos during that season.
Choosing the right tools
And of course, a practical sketching kit is also important. I generally make sure I don’t bring too much equipment, since I have to carry it all and I still need some energy for making art. Transporting sketching equipment on the bicycle can also be a good alternative, and the bike can act as an easel. I always bring a mat or a small stool to sit down everywhere, and I try to make sure to organize each part of my painting equipment, so that I don’t have to search very long for anything. If you want to see my current sketching kit in detail, I’m happy to show it in another post – I’m always adapting it, but right now I’m very happy with my setup. Most important for me is that I find all my tools quickly and can reach them with one hand, and that I don’t risk losing them in the field (this happens from time to time..I’m currently mourning the loss of my trusty mechanical pencil)
One last thing: Painting outside will never be as comfortable and easy as is painting in the studio, just be aware of that when you struggle. It’s ok to be a bit uncomfortable the first few times, but very likely you will be happy you tried afterwards, and you will have lasting memories of that day!

Simple rules for quick landscape paintings:
- decide what the painting is about
- Observation is key – take your time for this
- start with big shapes, group values together
- big to small
- value is more important than color
- leave out details that don’t add to the essence of the painting
- add contrast and details and edges where you want the viewer to look at, add accents last
- keep comfortable when you’re sketching
- bring practical tools
I hope this contained a few useful ideas for your next (or first!) outdoor sketching session and took the mystery out of plein air painting a bit.
I’m also currently thinking about a video class on landscape sketching to include more practical tips and demos, and I’d love to hear if you would prefer a short and more spontaneous class with a bit of useful theory and some field sketching demos, or a longer more comprehensive class with more theory and concepts plus demos, that will take several weeks to complete and include assignments (not unlike my recent Sketching Fundamentals class). Let me know in the comments if and what you’re interested in!
Thank you for reading this blog! It'll always stay free. To keep it going, you can support my work directly through a donation or through my nature sketching classes.

Join my free newsletter and never miss a blog post! You'll get new blog post notifications directly to your inbox. Receive 5 great sketching resources as a welcome gift for joining my newsletter! Here's what's inside:
- How to draw anything (PDF guide)
- Getting started with watercolor (free ebook)
- My favorite tips for creating great sketchbook pages
- My 5-step guide for drawing birds (PDF guide)
- My current watercolor palette layout (PDF guide)
By subscribing, you agree that I may process your information in accordance with my privacy policy
This is helpful advice for me. As a novice, i am easily trapped in the details, painting tight and with an overloaded brush. Trying to be exact when really a sweeping, graceful impression is what i’m after. Learning about values and shadows is key for me in my effort to paint so that near/far and 3-dimensionality become more accurate.
Please tell me about the purple-handled brush you are using for this landscape example: What is the brand, size, and style (that is to say filbert or cat’s tongue or almond, round, etc).
Thanks for taking the time to create these very informative tutorial posts!
I know what you mean Karen, plus painting details can be very relaxing and fun, whereas making a bold stroke can be terrifying (but also very satisfying). The good news is that seeing and applying values is manageable with a bit of practice.
The purple brush is a no-name acrylics brush – it’s just a size 1 synthetic filbert, and I use it most often for mixing and not so much for painting.
I really did appreciate this post. I like to do plein air as often as I can and the thought of not focusing on too many things, and doing bigger shapes was helpful for me because once I get in my setting I am overwhelmed with the beauty and I try to catch it all. So I need to sit and figure out what it is I want to capture. Thank you, loved this and I am inspired to get painting in just a bit!
Thank you! I know that feeling of being overwhelmed by all the beautiful things in nature. It does really help with painting to choose one aspect and keep the other ones for the next painting. Happy painting Jennifer!
Thank you for this great post. I am a beginner and long to do plein air, but, at the moment I don’t have the confidence and it’s much too hot. I’m always interested to see others set-ups.
I know, it’s much too hot here, too! I’ll try and create a post about my different setups soon.
Thank you so much for another timely and helpful, encouraging post. Yes, I would be very interested in seeing more of your field setup, especially in standing with an easel or using your bicycle for support. Your thoughts on finding an appropriate spot are so good for me to keep in mind. As a beginner, most anything I sketch is for the first time and just hanging out amidst some flowers, looking closely, losing track of time and soaking up their beauty is all part of the process. Either a spontaneous set of videos or a structured class would be wonderful. I learned so much from your Foundations class and really enjoyed it. I am also curious how you go about catching colors when you are doing careful botanical paintings and you intend the colors to be more accurate. So much to learn! Thank you for being such a good guide along this path.
Thank you Laura! To be honest, I almost never use an easel, but I will try to find a picture where I had propped everything up on my bicycle. This approach definitely needs more refining too.
I love how you describe your sketching process, soaking it all up and losing track of time is really what I try to do 99% of the time. And thanks for your feedback – I hadn’t thought about doing a class about botanical sketching, but now that you’ve mentioned it I like the thought very much! I’m glad to hear you find my teaching approach helpful, and I will try to produce more inspiring material. 🙂
I would be interested in a longer class like your Sketching Fundamentals class. I really enjoyed that class. Like the person above said, I am a novice and tend to be tight and focus on details and getting everything exact. I would love to learn to loosen up!
Thanks!
Thanks Susan! I guess I will start to prepare for creating a longer class, it could take a while… I guess the urge to get everything exact is a blessing and a curse, and landscape sketching can be a really effective tool to unlearn that tendency. One quick tip that has often worked for me: use the biggest brush you can, that way you are forced to make bolder strokes.
I appreciate the organization of your kit and lessons, the fact that you use a bicycle is inspiring too. I think a several week course with you would be my choice since you are presenting the option. If I didn’t have an option then I would still follow along because I think what you are doing is good for the body and mind and it helps bring a focus to the moment with the practice. Thank you for sharing.
Thank you Joshua! I really only have used the bicycle a number of times as a makeshift easel, it’s far more useful to transport me and my stuff to a nice place where I can sit down. I just realized the longer class could take me a while to finish since there is so much going on right now. But I will definitely come up with something. Thanks for following along and being here!
I keep coming back to this blog post as this is still something I am struggling with. What colors do you have on your palette? It is amazing to see the variety of greens you have in this painting!!! So beautiful and serene looking. Thank you Julia for sharing this.
Hi Ana, my palette more or less still looks like this (I have added a few purples/pinks during the summer, but they’re not important for landscapes): https://juliabausenhardt.com/my-updated-sketching-palette-in-2021/
Currently the only green I’ve kept is sap green, and I keep mixing other colors into it so it won’t look the same everywhere. Adding yellows and blues, but also small amounts of red and brown is helpful for landscape sketching. I hope that helps you!